
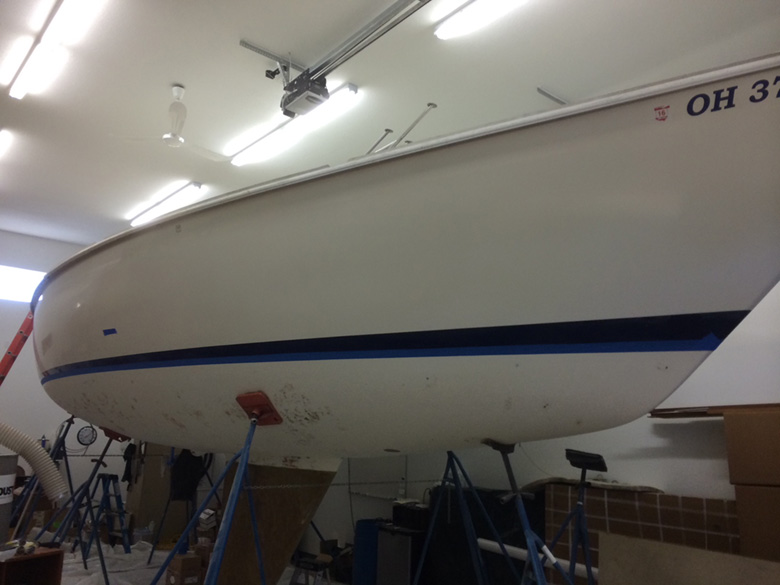
Another project that was completed during the first winter was a complete epoxy bottom job. When I purchased the Pearson 36-2, the bottom was coated with VC Tar and VC 17. The bottom coating was alligatored and checkered, but was not in terrible condition. However, during the survey, the moisture meter indicated moisture in various areas around the bottom. As literature about boats manufactured in the mid-80’s suggested that the bottom may be blistered, I decided to tackle the bottom that winter.
I started by having the yard sand blast the bottom after the boat was hauled. My preference would have been soda blasting as it is less aggressive but the yard only offered sand blasting. Having stripped the bottom of my previous boat (a 1978 Pearson 31) myself, I decided that the $900 charge to blast the bottom was well worth the money. The sand blaster operator did a meticulous job, stopping at the gel coat as requested. He blasted up to within about 2” of the waterline. That left me a bit of work to do, which I did once the boat was moved into the heated storage unit.
Sanding off that last couple of inches was a real chore. However, because I decided that I would eliminate the small section of white gel coat between the bottom and the boot stripe and take the epoxy up to the boot stripe, I was able to sand up to and past the edge of the bottom without worrying about marring the surface immediately above the bottom. I used packing tape to hang a curtain of plastic from the hull around the boat, and I wore an appropriate respirator, ever protection and ear plugs. I illuminated the bottom with halogen lights and I used a random orbital sander and 80 grit paper, changing and the paper frequently to sand. As the sand blaster was careful to stop a little early rather than take off too much (as I requested due to aggressiveness of sand blasting), I ended up doing a sanding of the entire bottom using the random orbital sander and 80 grit paper just to be sure the entire bottom was down to clean gel coat.
Once the bottom was blasted and sanded, it was clear that the boat did suffer from a significant but not serious case of blisters. Their sizes ranged from pinhole up to about 1/4” and everything in between.
The process to repair the blisters was tedious but straight forward. Each blister was ground out using a Dremel tool with a tungsten carbide cutter bit (#9906) made for cutting hard materials like steel, iron, ceramics, plastics and hard wood. I went through about a dozen of those bits, which wore out fairly quickly. In some cases when the blister was larger or deeper, I ground down to fibreglass. Others did not require much grinding. I suspect that the average grinding time on each blister was less than 10 seconds. However, there were hundreds of them, so the process took some time.
Gel coat blisters repaired.
Once all of the blisters were ground out, I cleaned up the dust, vacuumed the entire bottom with a shop vac, and then wiped the bottom down with Interlux Fiberglass Solvent Wash 202 several times. I then let the boat sit for several months inside the dry, heated storage locker, as I wanted to make sure that the bottom was entirely dry before filling the blisters and applying a new epoxy bottom. When it came time to fill the ground out blister cavities, I wiped the bottom down again with Interlux 202. I then mixed small batches of West System epoxy mixed with colloidal silica. The epoxy kicks and hardens quickly so I made sure I never mixed more than I could apply in about 10 minutes. I used a West System flexible plastic spreader to trowel the mixture into the blister cavities on the bottom of the boat. Most of what goes on gets sanded off, so much like drywall finishing, I found that a couple of thin coats was better than one thick coat. After filling the blister cavities once, I sanded the epoxied spots smooth with the random orbital and 80 grit paper. I then wiped the spots with fibreglass solvent wash and repeated the filling process where additional material was necessary to completely fill the cavity. After the second application, I sanded the spots smooth.
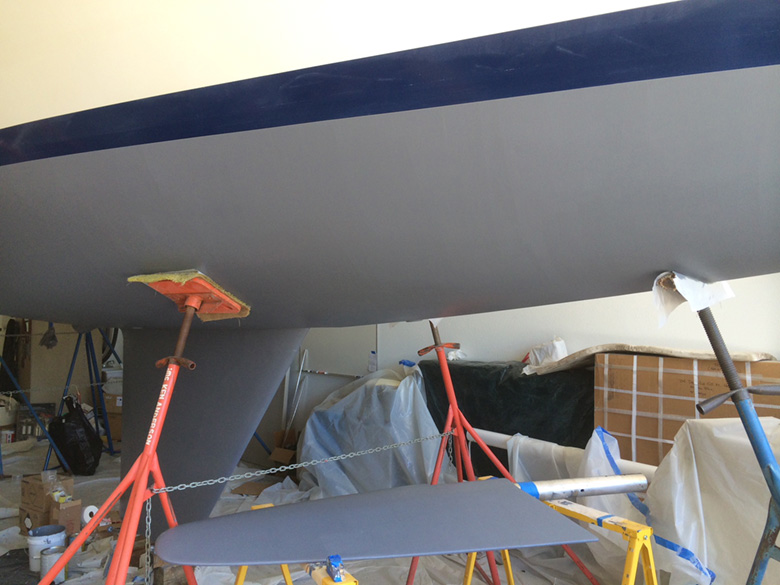
After I was satisfied that all of the blisters were properly filled and the bottom was sanded smooth, it was ready for epoxy. I thoroughly cleaned the area around the boat, took down the plastic curtain surrounding the bottom, and wiped the bottom several times with Interlux 202. I then taped the bottom edge of the boot stripe, all of the bronze through hull fittings, the bottom of the strut and the shaft with blue soft release painters tape in preparations for the epoxy. The epoxy product that I chose for the bottom was Interux Interprotect 2000e, which is a 2 part epoxy that is available in gallons and quarts. While one gallon is priced lower than four quarts, I chose to buy the epoxy in quarts. The reason is that it takes less than a gallon to completely coat the boat, and as the 2 part mixture is pre-measured for the quantity that you buy it in, quarts gave me better control when it came to mixing the closest quantity for the job and wasting the least amount of this expensive product. I don’t recall exactly how far a quart went, but I think that I was able to cover the entire bottom, rudder and keel with about two quarts of epoxy. I also chose to roll the epoxy rather than spray it. I used a West System 7” foam roller for that task, and changed the pad for each coat. The thin foam roller left a nice finish behind, and did not pick up too much extra material. When I did the same job on my previous boat I used a 3/8” nap household paint roller and not only did it pick up too much epoxy and waste product, but the finish was rough and orange peeled.
The epoxy instructions suggest a minimum thickness of 10 mils which they claim will take at least 3 coats. The instructions explain that the product should be applied in successive coats, one after the other, with minimum drying time of 2-3 hours between coats when the temperature is 70-80 degrees as it was that day. I was working in a building so rain was not a concern. However, the epoxy lets off some serious fumes while curing so good ventilation and a good respirator are musts. I epoxied on a warm spring day and left the garage door open all day as I worked. The epoxy comes in white and grey. I bought equal amounts of each so that I could alternate colors between coats. That made it easier to see where I had been and what was left to do. It also allowed me to progressively step out by about 1/2” around the jack stand pads between each coat (see photo), which would allow me to knit the coatings of those spots together at a later date when I was able to move the jack stands.
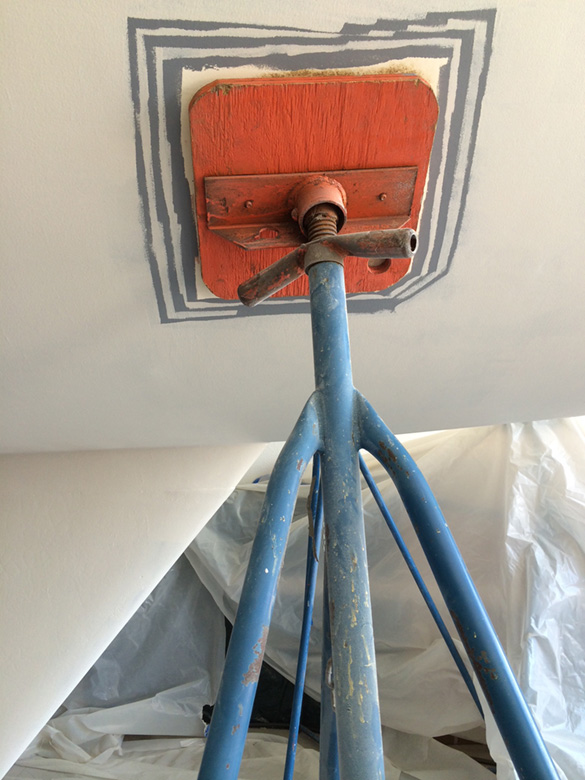
Epoxy stepped out around jack stand pads.
I found that it took me just about 90 minutes to get all the way around the boat with a coat of epoxy and not long after I finished each coat, the area where I had started passed the thumb print test (if you can leave a thumb print in the finish but not get any on you thumb when you touch it, it is ready to overcoat) and was ready for the next coat. I had access to a portable pneumatic paint shaker (it worked off of a basic air compressor) so that made mixing the epoxy easy and allowed me to multitask. I applied a total of seven coats of epoxy over about a sixteen hour period that day.
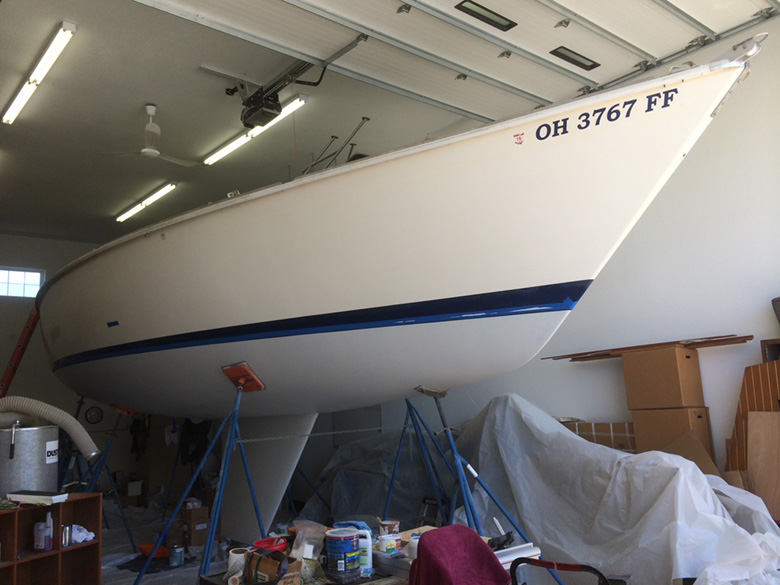
Epoxied and ready for anti-fouling.
I chose to apply Pettit Vivid for bottom paint. I used it on my previous boat and it worked well for our conditions on Lake Erie. The boat bottom always cleaned up well when the boat was hauled, and I was able to go several seasons without repainting. It is critical to apply the first coat of bottom paint in accordance with the instructions – shortly after the last cost of epoxy is applied and before it is fully cured. This allows the last coat epoxy and the first coat of bottom paint to form a chemical bond. I planned on applying three coats of bottom paint, and chose to use a different color for the first coat so that I had a warning coat. The idea here is that as the ablative bottom paint wears or is scrubbed away, I will not have to think about adding bottom paint until I see the warning coat coming through. That way, in theory I should never get back to the epoxy. I applied the first coat of Vivid (the warning coat) within about 3 hours of applying the final coat of epoxy, using the same type of foam roller. I then removed all of the tape from the boat and it’s fittings. I didn’t want the epoxy to fully cure while lapped over the tape, as removing the tape in that situation will also likely peel some epoxy off around the edges (I learned that the hard way on my last boat). That day was a long day, but Boondoggle has a new bottom that I hoped would deliver years of maintenance free sailing. Several days later I returned and applied additional coats of Vivid. Prior to launching, I moved the jack stands to expose the unfinished spots and began the process all over again for those seven small spots. With each coat of epoxy, I stepped out 1/2” – consistent with the way the surrounding coats had been applied, in order to stitch the coats together.
First coat of Petit anti-fouling, blue warning coat.
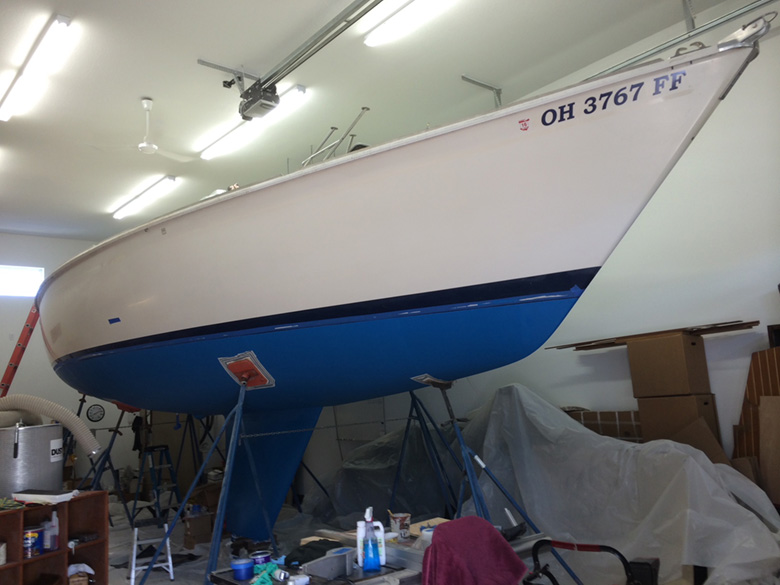
Final coat of anti-fouling bottom paint.
I removed the rudder to facilitate the bottom job, and took advantage of the opportunity to modify the rudder to avoid a common problem that other P 36-2 owners had experienced. It was explained to me that the rudders were constructed with two separate fiberglass shells laminated onto a foam core. That type of construction left seams on the leading and trailing edges all the way around the bottom of the rudder. While the problem was not apparent on my boat, other owners reported that water had gotten between the fiberglass shell and foam core causing delamination, presumably after freezing in the winter. I never saw a rudder with this problem myself, so I am only speaking anecdotally here. However, to avoid that problem with my boat, I had the leading and trailing edges tapered down to accept several layers of fiberglass wrapped around and over each edge and around the bottom. They were tapered in and sanded smooth, and then two layers of fiberglass wear applied around the entire rudder. The rudder was then sanded smooth. I then used the Dremel with the tungsten carbide cutter bit to grind out a 1/4” channel around the rudder stock. I filled that channel with 3M 4000 to create a water tight seal. The rudder was sanded smooth and wiped clean and then coated with seven coats of epoxy while the bottom was being coated.
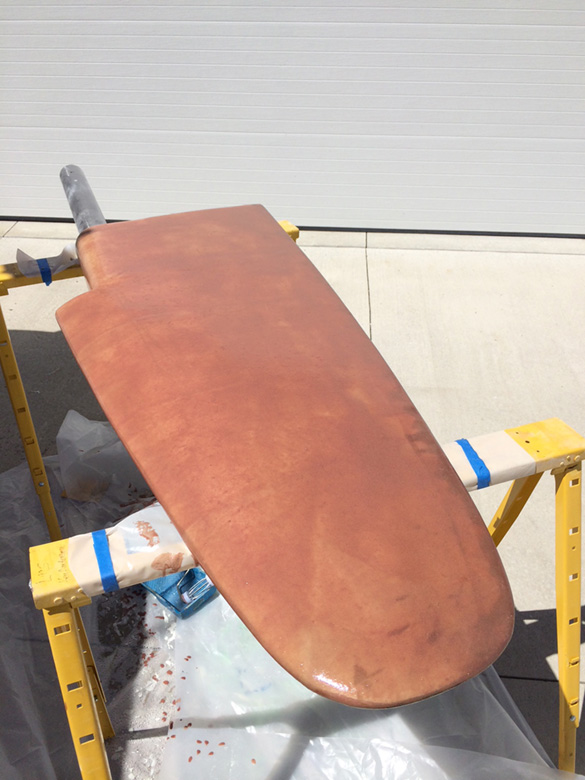
Rudder removed for re-coating.
While the rudder was out, I removed the Teflon sleeve bearing inside the rudder post housing (it was held in place by a single countersunk screw), cleaned the sleeve bearing and reinstalled it after liberally coating it with grease (I used Lubriplate 130-AA multipurpose calcium type grease). Prior to reinstalling the rudder, I climb into the aft steering gear area through the sail locker and drilled small holes in the upper rudder post housing and installed two Zerk fittings just beneath the quadrant. I am now able to attach a grease gun and easily lubricate the rudder post with the Lubriplate grease.
This article was immensely helpful when I soda blasted, sanded and repainted the bottom of my Pearson 36-2! Thank you for publishing this!