
Tom Wynne purchased a 1985 Pearson 36-2, hull #54, in the spring of 2013 and since has undertaken a fairly major refit of the boat and has used it fairly extensively on Lake Erie. Tom contacted myself about posting a series of project articles in hopes of assisting other Pearson 36-2 owners who are considering tackling these same projects.
Tom reports that “Several times now I have had people walk up to the boat and say something along the lines of “I thought Pearson stopped making boats 25 years ago” or “when did Pearson go back into production.” That is always a great compliment.” He obviously has great pride of ownership and as you will see in the accompanying images, Tom has done great work and the compliments are deserved.
We are planning on posting his projects in the upcoming weeks, so follow along. Hopefully you’ll be inspired to take on your own project! It’s well worth the effort.
Also, if there is anyone else out there that would like to have their boat project added to this site, I encourage you to send your project story and images to me at editor@boatdejour.com. I would love to see more Pearson 36-2 projects!
–Editor
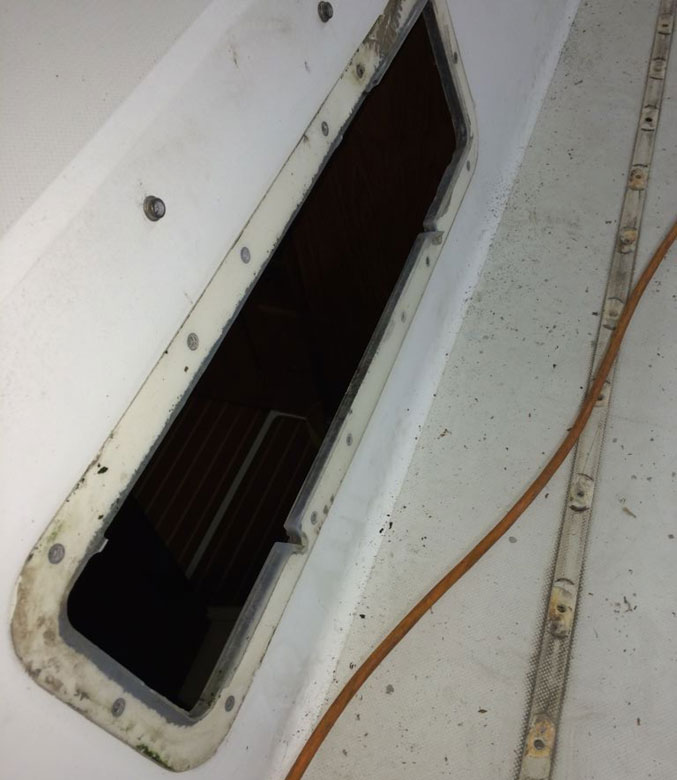
Portlight removed
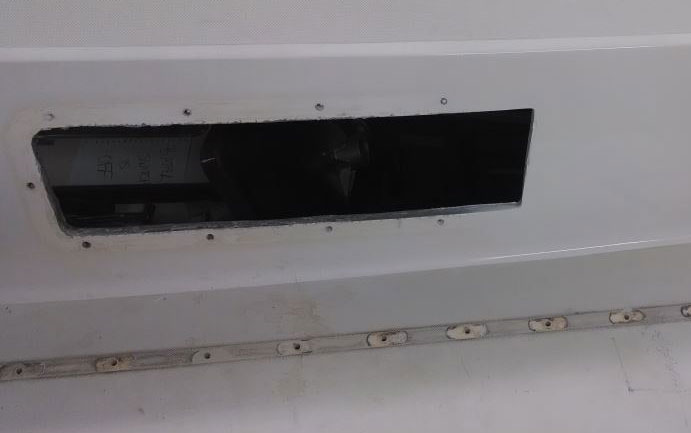
The forward opening has been refilled with fiberglass.
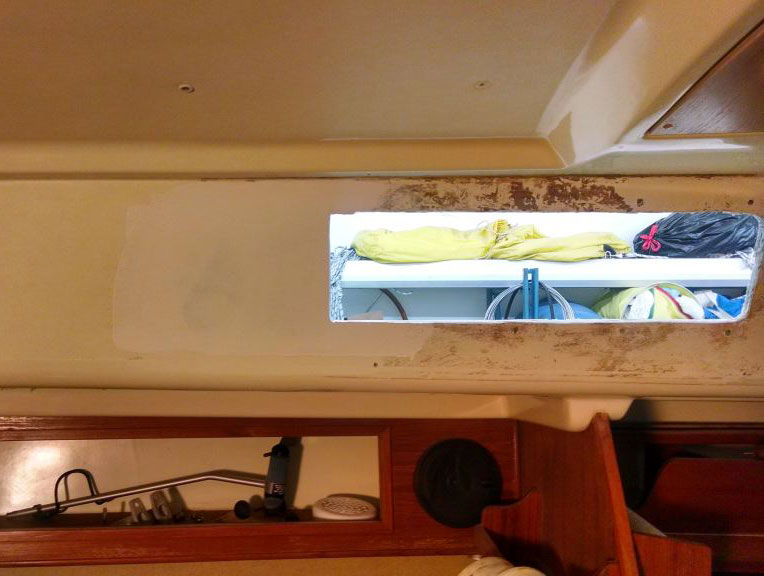
Here the teak plywood has been removed and the fiberglass repair has been completed.
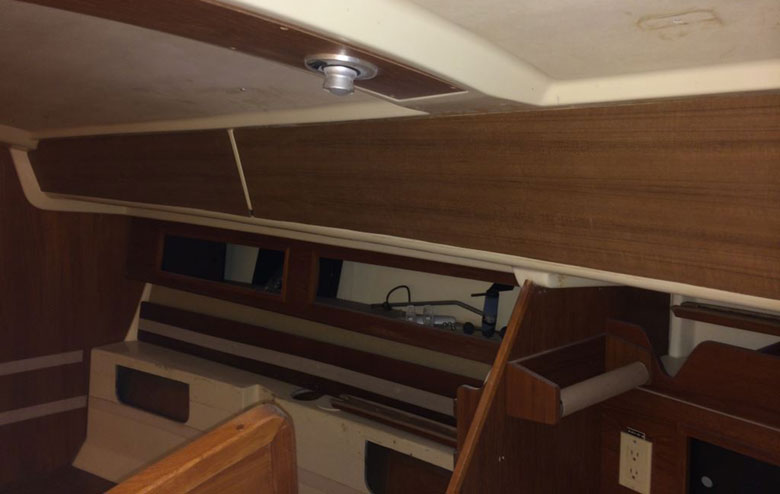
The starboard teak plywood panels have been installed.
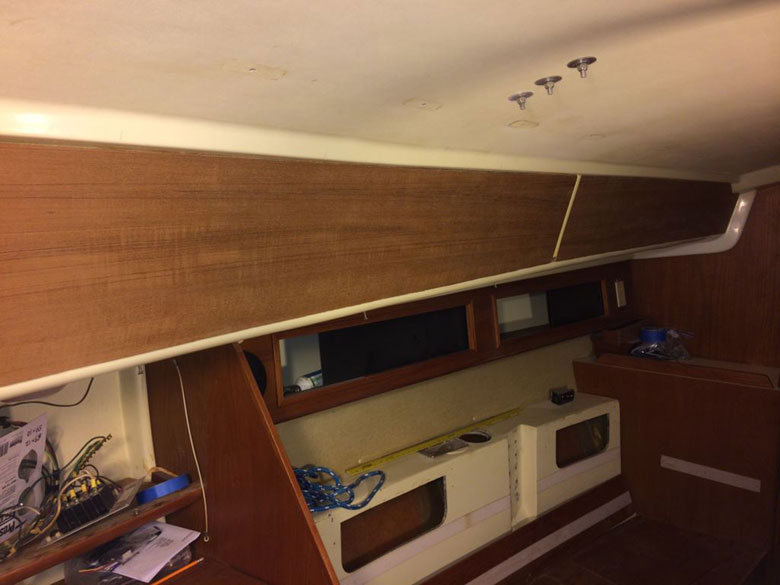
The new teak plywood panels have been installed.
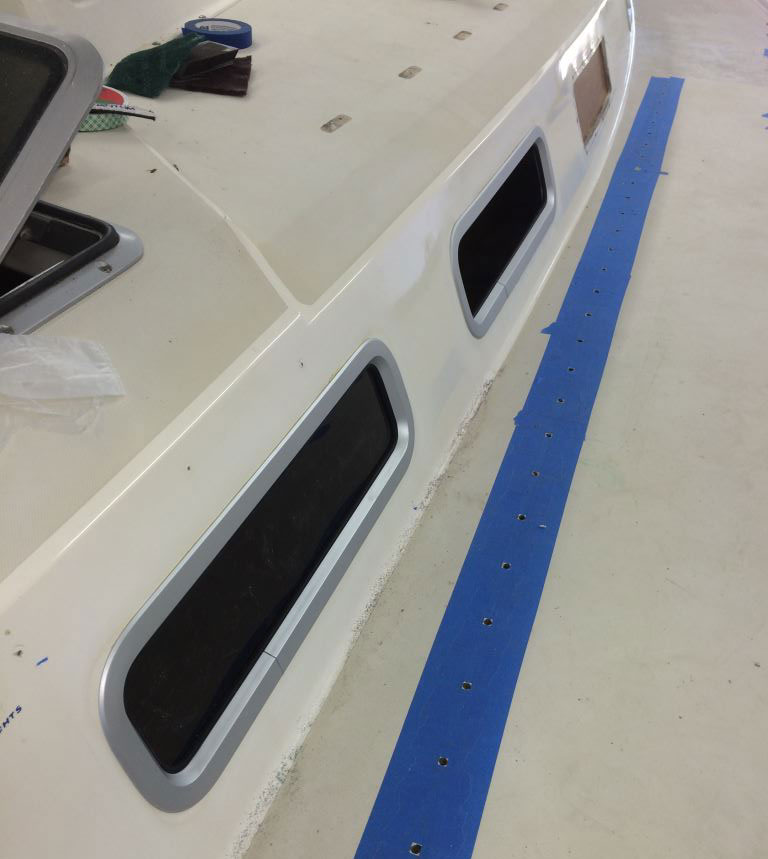
Two new Lewmar portlights have been installed.
Starboard portlight install has been completed.
Portlight Replacement
One of the projects that I undertook over the winter of 2014 was to replace the 11 portlights on the boat. There were several reasons why I decided to undertake this project:
- The old plastic portlights were cloudy and scratched up, and I didn’t like that some didn’t open (like the angled one) and others had openings significantly smaller than the actual portlight.
- The wood plywood on the inside of the boat around the portlights was delaminating as the bedding around the original portlights was failing/had failed.
- One of the only things that I didn’t like about the boat (purely aesthetics) when I first looked at it was that the white plastic portlights were cheap looking and the angled one really dated the boat.
For those reasons, the portlight project made it onto the extensive list for the first winter I owned the boat.
That winter I had the luxury of storing the boat inside a storage condo that served as the workshop for a friend in the boat repair business. I was the only boat in storage condo, which was a few blocks from the water, requiring that the boat be transported on an over-the-road trailer and then set on jack stands in the heated shop. I had 24/7 access to the locker, to my friend’s tools, and to his expertise (all of which really helped this project and the others that I have undertaken).
Remove Portlights
The first task was to remove the old portlights (very easy – I simply removed the fasteners and they came right apart with the slight help of a putty knife). The difficult tasks were then to remove the bedding on the outside of the boat (razor blades and acetone) and remove and replace the teak wood on the inside of the boat. At least on my boat, Pearson glued the heck out of the wood when they installed it. It was a plywood with several layers, so while 90% came off easily, the difficult 10% left behind was the bottom layer that remained glued to the interior liner. I had to use elbow grease, a heat gun, acetone and adhesive remover, and a scraper and it took a long time to clean off the surface to ready it for the new wood. It was a tedious task, made more difficult by having to use acetone and adhesive remover in the enclosed cabin.
The next step was to have some fiberglass work done on the angled portlights to ready the openings for replacement with rectangular portlights. A portion of the forward/pointed part of the openings had to be glassed in and gelcoated. I was aware of a good glass/gelcoat guy, and engaged him to do that part of the project. The charge for the fiberglass and gelcoat work was $495 including materials.
As we live on the southern shore of Lake Erie, I had the good fortune of being introduced to a craftsman who had worked for decades at nearby Tartan Yachts. At that time, Tartan was slow and he and one of his co-workers were happy to pick up some side work. This was the first of several projects that I engaged them on. They created templates for the area that I wanted to recover with new teak plywood, and then they cut and shaped (the edges needed to be mitered all the way around for a clean fit) the teak to fit perfectly. Note that both sides were different in dimension, and not symmetrical, so to do this part of the project correctly each side needs to be completely templated from end to end and top to bottom as they are significantly different from side to side. The sheet of teak plywood was $150. I installed the new teak panels using contact cement. The process was straight forward. I rolled a coat onto the teak panels, and a coat onto the receiving surface on the interior liner bulkhead, and after waiting the requisite time I married the two and let it dry.
Installation
The portlights that I chose were Lewmar Standard Opening Portlights. They have friction hinges that allow the acrylic lens to open and remain open at any angle. They come with mounting hardware (the process requires a cutout just smaller than the outside diameter), and portlight itself is held in place by screwing a flange from the inside of the boat (essentially sandwiching the boat between the portlight and the flange/ring. The inside flange and bolts can be covered with a plastic trim ring that comes with the portlight, and the portlights come with screens. They come in many different sizes, and come with a pattern so that you know how large the cutouts need to be in the boat. I was able to find portlights for each existing opening that were just slightly larger than the original openings, requiring each opening to be slightly enlarged. The cutouts in the boat were made as follows:
- The paper template was used to make a plywood template to guide a router with a carbide cutout bit.
- The plywood template was temporarily mounted to the outside of the boat in the appropriate place using double faced 3M tape.
- A router was used to enlarge the hole.
Once the holes were cut, I found that there was a void between the outside fiberglass of the cabin top and the inside liner. I filled that void with thickend epoxy (West 611) and spread the epoxy around the entire opening to seal it. I also applied 2 coats of West System epoxy to the new teak plywood, being careful to also coat (and thereby seal) the inside of the cutouts. That way, if the portlights do leak, they teak plywood will not deteriorate as the original plywood did.
Once the cutouts were made and sealed, the portlights were bedded with butyl tape, pressed against the hull from the outside, and the interior flanges were bolted on to complete the mounting. I used butyl tape as that is what the Tartan guys suggested. Since installing them, two have developed small leaks. To solve the leaks, I unbolted the ones that were leaking, pulled the butyl tape away (easily removed) and re-bed the portlights using 3M 4000. That solved the problem. The 3M 4000 bedding process is to hold the portlight in place and trace around the outside of the portlight frame onto the exterior of the boat. Tape just outside of the tracing line with blue painters tape. Apply a bead of 3M 4000 around the exterior of the hole and press the portlight in place and hold it there while someone from inside the boat puts the mounting flange in place and installs and tightens the bolts. The excess 3M 4000 can be easily cleaned up using mineral spirits BEFORE IT CURES. Otherwise, it can be cut away after it cures, in which case the aluminum frame should be taped as well before installation to avoid curing 3m 4000 on the aluminum frame.
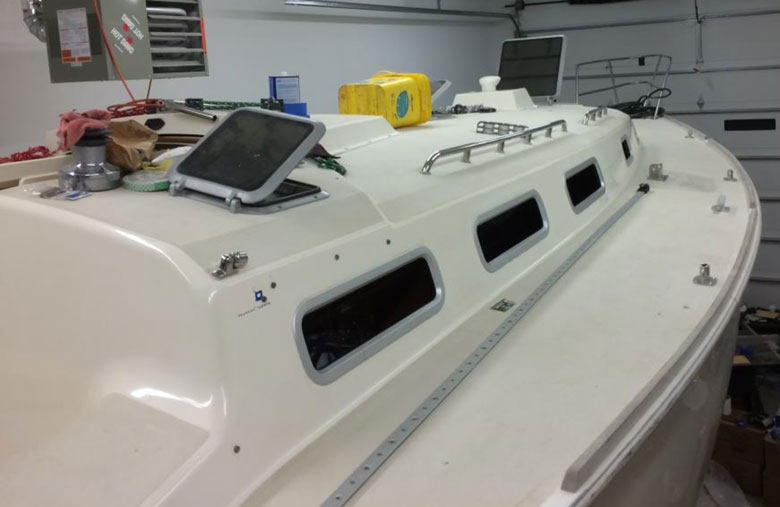
The end result is that I have nice, attractive, relatively affordable portlights (in 2014 the 11 portlights cost me $2,622) with screens. All of them open fully allowing for great ventilation inside the boat, and the one in the aft cabin is nearly twice as large as the original one that I replaced, which certainly helps airflow back there.
Post Project
If I had it to do over again, I would probably take a closer look at the stainless steel portlights offered by New Found Metals for the following reasons:
- They look a little more traditional and I think they would give the boat a much different and an even better appearance
- they have a lip on the outside that surrounds the portlight opening and protrudes outward, which I suspect would help in situations when there is water running down the deck (with the Lewmars, anything that runs off the deck runs into the open portlight)
- And I think that the screens on the New Found Metals portlights can be left in permanently.
The Lewmars advertise that the screens can be left in, but doing so compromises the smooth seal when the portlight is shut and the seal leaks. I therefore find myself removing the screens and reinstalling them when we spend the night on the boat. That is problematic when it rains in the middle of the night, as they need to be removed to close the portlight. Putting the screens in and taking them out isn’t difficult, but it would be nice if they really could be left in permanently. I don’t recall what the price difference would have been between the Lewmars and the New Found Metal portlights (I did look at the time) but I believe that they were at least 2x as expensive.
Thomas,
I am looking to undertake the same project this spring. Was hoping to could provide more information on the portlights; if possible the models used.
Daniel – sorry – just saw your comment. The portlights that I used were Lewmar Standard Rectangular Portlights. There are three different sizes required. As you can see, I got rid of the large angled portlights which I think date the boat. That took a little bit of fiberglass and gelcoat work, but I think the boat looks much better without them. Lewmar does make angled portlights (I have two of them available, as I initially bought them but they would have still required some glass and gelcoat work so I decided that if I had to get into that, I would go with rectangular ones there too (with the added bonus that they open, where the angled ones don’t). I know for sure that the large portlights are #4’s but I don’t know for sure what size the smaller ones were. I will be at the boat later this weekend and will measure them and let you know.
we just purchased a 1990 pearson 362 and this is the first project I wish to under take for the very same reasons
Jack – consider the New Found Metals portlights. While the ones that I used work fine, I would much prefer a setup where the screens can stay in. I also think the stainless looks better. They are a bit more expensive though so if your budget doesn’t permit that splurge, rest assured that the ones I used are perfectly fine, durable, watertight, and the screens work fine. You just need to remove them to properly close the port light regardless of how they are advertised. This is a pain when you get a brief shower in the middle of the night.
Thank you Tom, New Found is the product I have decided to go with. Considerably more expensive but well worth it in my humble opinion. Love the boat, great sailing vessel.
send some pics once you complete the job. Would love to see what the boat looks like with the “fancy” portlights!
twynne@interlake-steamship.com
I will certainly document and post photos this winter. On another note, do you have any recommendations on the removal of the engine. I am getting a noise (knew this going into the purchase of the boat) out of the bellhousing area and am thinking of just removing the entire engine instead of simply pulling the transmission out. I want to replace motor mounts and generally clean up the engine compartment.
Thank you,
jack
One of the first things done to my boat after I bought it was I had the yard change the mounts (I had a broken one and didn’t have time to change them myself). They did it with the engine in place. I would imagine that you may have to deconstruct the cabinet around the engine to get it out but I am not sure.
Tom/Jack,
Hi, i have an 87 36-2 #141. I just began the planning to replace all the ports with NFM and changing the angled non opening port to a rectangular port. Is there a reason you added Fiberglas rather than cutting out Fiberglas to make it a tad larger? Any place you can point me to pics on the replacement process would be much appreciated
Paul – I did not want to enlarge the opening because i was concerned that it would look funny going from a small portlight forward to an extra-large one and then to a large one. If you aren’t concerned with that issue, then going larger is certainly easier. I can email you additional photos of my project if you want. Just send me your email address and i will shoot them off to you. It is a straight forward process. The important aspects of the project were: Create good templates for the cutouts that will allow the router to cut precise holes in the boat (the trim rings on the portlights i used were small, so the hole size is critical); and buy multiple cutting bits for the router and don’t go cheap on the bits – they dull quickly.
Tom
Hi Tom. Based on your post, I went ahead and made the plunge. I am in the middle of the portlight change. I just finished replacing 9 portlights with Lewmars. I strongly considered the NFM discussed above, but in the end the cost (given everything else I’m doing) forced me to the Lewmars. I still have to replace the two angled lights, as the new replacements dont fit exactly and will require a little glass work (as discussed above, too).
Nice to read all these posts about the Pearson 36-2. I have a 1987, hull #141 that we bought new. It has sailed extensively all over the east coast and Caribbean, and has held up well thoughout – even while in a charter fleet a few years in the 90’s. Unfortunately, she was out of the water for several years recently without much TLC so she showed the neglect.I am in the middle of a major refit, hoping to nurse her back to her original glory.
I removed much of the teak interior and am replacing/refinishing those pieces.
I came across a brand new (002 engine hours) Yanmar 3HM35F, so rather than rebuild our engine with 5000+ hours I’m replacing it, which gave me the excuse to completely powerclean the entire bilge area. In that process, I decided to replace some of the wiring laid through the bilge as much of the sheathing was deteriorated or just plain messy. Also tackled the waterheater (does anyone know of a good water heater that doesnt disintegrate in five years?)
I’m also rebuilding the galley area and replacing the laminate top with Corion. Any one have any idea what the black coating on the underside of the stainless steel sink is? I imagine it might be for heat protection from engine. I managed to remove it all, it peeled off relatively easily with help of a razor. Now I’m wondering if I need to replace it with new paint (?) or just leave it bare.
Also – any ideas about replacing the electrical panel? I’m considering using a Blue Seas combined AC/DC panel with 6 AC and 19 AC breakers. The old Nova panel needs replacement and just looks a little too tired. Also replaced black backing (on which panel is mounted) with teak. 30 years of different size radios, SSBs, stereos, IPOD charges, etc have rendered that black panel pretty unusable. Amazing how a nice piece of teak brightens the whole nav station.
I have thousands of questions but am having good fun draining my wallet in this endeavor!
Paul – I have a router template for the angled portlights if you need it. I also have 2 brand new angled Lewmar portlights that I would make you a good deal on if you haven’t already purchased them. I decided to do glass work and gelcoat work and then turn those angled ones into rectangular opening portlights, but not until after I already purchased the angled ones (once I figured out I needed to do glass work either way, I opted to go with opening ones forward instead of angled). If you are interested in the template or the portlights, shoot me an email at twynne@interlake-steamship.com and we can figure something out. I was going to do Corian this winter but never got around to it. I actually separated the keel from the boat to re-bed the keel, so that was my big project for the winter. I will write that up at some point with pictures and details. Perhaps you would consider writing up your Corian project when you are done with it so we can have Eric add it to the articles here for others to benefit from.
Tom
where can I get replacement plastic interior trim for the fixed angled portlight on the pearson 36-2? I need the port side trim but will take both .
Thanks very much,
Jack
D&R Marine is a great resource. You might also be able to get one from someone that is replacing their portlights.
Here is the info for D & R.
D & R Marine
14 Water Street
Assonet, MA 02702
http://www.drmarine.com/products.asp?cat=381
I need to dothe exact same thing on my 36.2 1987 pearson sail boat! who can help me? the portlights are out and now I need to figure out how to make the temp plate patterns. boat is in newberyport ma who can help for a fee?
The portlights come with templates. Trace them onto plywood and cut them out. Double face tape to the boat and router them out.
I like to install a mast pulpit and wonder if anybody has ever taken down the ceiling in a
36-2 pearson?
I like to install a mast pulpit and wonder if anybody has ever taken down the ceiling in a
36-2 pearson and installed one
Thanks
I like to install a Granny pulpit and wonder if anybody has ever taken down the ceiling in a
36-2 Pearson and installed one
Thanks
Harald,
I have not installed a mast pulpit but I have made some other deck penetrations and can offer the following suggestions. Where I installed the double stack turning blocks on the deck to direct my halyards back to the cockpit, one is positioned nicely so the nuts are hidden behind the teak cover above the sink and countertop (the one with the lights mounted to it) and the other is on the opposite side, with no way to hide it. The way i dealt with that is to cut bolts off at the proper length and use acorn nuts. It looks fine – nice hefty stainless steel washers and acorn nuts pulled up tight against the headliner, which is tight against the underside of the deck. Depending on where you mount the pulpit, if you have to cut through the headliner and it isn’t tight against the underside of the deck, you can always use a hole saw to get through the headliner and then plug those holes. They sell white plastic plugs – you already have some in the cabin on the underside of your sea hood. They allow for accessibility but blend nicely into the headliner. A third option would be teak strips. When i replaced my outside handrails with stainless rails, i had the rails made with threaded holes in them and the bolts were installed from inside the boat and screwed up into the stainless handrails. This allowed me to position the interior rails in a way that the bolts could be used to secure them back to back with the exterior ones. used teak strips mounted under the interior handrails to cover up the previous holes. It all looks very clean.
Does anybody have rigging specs for Pearson 36-2 with centerboard? I have a loos gauge but I am not sure if I am doing it right.
I am still looking for info on center board repair and maintenance.
Thanks
Has anybody ever replaced the exhaust hose on a Pearson 36-2?
I have. Pretty straight forward. As I recall, i had to use a knife to cut the hose off of the nipple on the water muffler, as well as the nipple on the tailpipe fitting that goes out the transom. Once i cut the hose free, i tied a line to the end that attached to the transom, and i pulled the hose out by pulling on the end that came off of the water muffler. I secured the tag line to the new piece of hose and pulled it back through the way the old one came out (in other words, i climbed back into the transom and pulled on the string to pull the new piece through while someone was in the boat feeding the hose aft. It didn’t take very long. If you need a measurement, i have a piece of the new hose left in the basement and can measure the ID and let you know what that dimension is. My records indicate that i purchased 16′ of the hose to run from the water muffler to the tailpile, and i have some left so it’s shorter than that
that would be great because my boat in in Newfoundland and I am in Ontario. I need to buy a new hose because It is not easy to get in Newfoundland. I have a leak somewhere when under power so I am assuming it is the exhaust hose. Maybe you can let me know the brand of hose you bought. I had a hard time finding the muffler under the stairs.
Thanks
Harald
Has anybody ever cut a inspection port on the starboard stern side of a Pearson 36-2? i have a Alfa 3000 autohelm and need some work done on it. Very difficult to access from the port side
Do you mean on the aft bulkhead of the aft cabin? If so then yes – I have. We put a nice access door in there. In addition to access it also provides some additional storage for items that we rarely or never use. I’ll send you some pics.
Thank you very much, looks great, do you have specs for tuning the rigging? Thanks